Simple Falafel Balls

Falafel Recipe
1 can Garbanzo Beans, drained (15 oz.)
1-4 cloves garlic, chopped or pressed
1 shallot, diced
2 Tbl chopped parsely
1 tsp cumin
1 tsp coriander
3 Tbl All Purpose Flour
3/4 tsp salt
1/4 tsp ground black pepper

Place all ingredients in a food processor and blend until you get a mealy dough you can shape. Depending on how much oil you want to use, use a spoon to scoop dough and form into balls (lots of oil) or you can flatten them into patties (less oil) that you can fry.

If you have patties you can use 1/4 inch of oil in a pan and fry them on each side until golden brown. If you have balls, use enough oil to cover half the balls while frying. Place on paper towels and sprinkle lightly with salt.

Discussion
This is a quick recipe for making falafel balls. Another school of thought says to avoid canned garbanzo beans, and instead use dried beans that have been soaked for 24 hours in water. You might try that instead if you have time.

Easy Meatloaf Recipe

I think of meatloaf as a way to take a pound of ground beef and stretch it out into a yummy meal, that will also yield a good lunch or two. This recipe goes together quickly, and makes a nice savory meatloaf.


1 lb ground beef
3 slices of bacon
1 tsp salt
1/4 tsp ground pepper
1/2 cup bread crumbs
Ground pepper
2-3 stalks celery
1/2 yellow onion
1/2 Orange or red bell pepper
Mushrooms
Handful of oats
2 toasted pieces of bread, cut into little cubes
1 tsp chili powder
1 tsp tomato paste
a few shakes of Worcester Sauce
1 egg
1/2 cup milk

Slice the bacon into thin strips and render in a frying pan until the fat is released and the bacon is cooked but not crisp. Remove from pan and set aside, leaving fat. Add onions and bell pepper, cook until soft. Add celery, cook for a few more minutes. Remove from pan and add to the bacon. Add mushrooms to the pan and saute in butter until browned.

Combine all ingredients, place into a buttered or oiled loaf pan, and cook at 350 for an hour. After the first 30 minutes, cover the top of the meatloaf with ketchup, and place back in the oven. You can make a more complicated  glaze by mixing ketchup with brown sugar, and various spices, but ketchup alone is already quite a loaded sauce and does just fine.

Let the meatloaf rest 10 minutes before serving.

Regular Potato Salad for two

potato salad

4 yukon gold potatoes peeled and cut in half
boil until soft (10 minutes or longer, poke with knife)
rest in cold water, then cut to desired thickness
2 celery stalks, chopped
2 green onions, sliced

Dressing:
1/3 cup mayonnaise
1 tsp mustard
1-2 tsp apple cider vinegar
sprinkle of paprika (1/8 – 1/4 tsp?)
salt pepper

enhancements: hard boiled egg, and black olives might have been good. Other potato types would have been fine.

I’ve never made traditional American potato salad, but we were having barbecue chicken sandwiches, and it seemed like a perfect compliment. Kim and Alec don’t like mustard, and Jude is picky, so I figured I would be the only one eating it – whichis fine with me because I love potatoes and the basic mechanics of potato salad regardless of type! And I’m always curious how quickly one can throw together small simple salads. When I think of making potato salad, my childhood associations turn it into some colossal event that only happens for planned occasions, but I know from watching shows like “Chopped” that most things can come together more simply and quickly than anticipated with a little know how. So I gave it a try and it was great!

Pasta Salad with leftover bowties

Jude wanted pasta with butter for dinner. Not a wide selection noodles given our quarantine conditions, but we had some bowties in the cupboard. They’d been there awhile so I emptied the bag in the pot, figuring I could use any leftovers to make a salad. Here’s what I threw together.

Pasta Salad with leftover bowties:

1 stick celery, diced
handful of cherry tomatoes, cut in half
1 green onion, sliced
15 kalamata olives, pitted
1 small garlic clove, chopped
salt & pepper
2 Tbl olive oil
1/2 Tbl balsamic pear vinegar
1/2 Tbl red wine vinegar

It was fantastic! It was enough for two good servings. All the amounts were estimated on the fly. Things that might have been good: Fresh Basil, capers, grated Parm or Romano.

Sunday Dinner in the backyard under quarantine

The days are getting nice enough to eat outside. We have a table in the backyard under a large tree by the little fishpond. It has a glass top that we’ve kept in the garage because of falling branches. I don’t think we got it out at all last year. But this year, with a little less distraction on the weekends during this quarantine season, Kim took some time to clean it up and put the table together.

We also got a delivery from the market today. So I had a little more freedom in terms of improvising what to cook for dinner. With some old tomatoes and half a bell pepper sitting around, I decided to make some tossed penne with chicken and tomatoes.

Normally when I buy chicken breasts at the butcher counter it takes two to make a pound. But at other markets, the prepackaged chicken breasts must come from giant chickens because they are often gigantic. Today’s grocery delivery had a single breast that was nearly two inches thick and weighed a pound without its other half. I decided to make Penne with Chicken and Tomatoes.

1 lb chicken
1/2 orange bell pepper
3 cloves garlic
3 roma tomatoes, diced
1/4 cup sun dried tomatoes
1 tsp tomato paste

Dice 1 lb chicken breast, sprinkle with salt, pepper, olive oil, toss around in bowl, then saute in a pan with hot oil for a few minutes until cooked. Remove from pan, add 1 Tbl butter and 1/2 chopped orange bell pepper. Let cook a minute or two until starting to soften, add the garlic, cook for 30 seconds more, then add the sun dried tomatoes, the diced tomatoes, and tomato paste. Cook for 1-2 minutes. Add the penne and stir. Add some pasta water if needed. Season with salt and pepper. Grate some Parmesan cheese over the top and stir it in, then serve with more Parmesan grated on top.


Birthday Barbecue

Jude turned 8 on Saturday. We decided to invite the grandparents over for a barbecue to celebrate. On Friday I picked up a 3 lb hunk of Salmon and a 2.2 lb brisket. My plan was to grill the Salmon and smoke the brisket. At just 2.2 lbs, I was sure the brisket would cook relatively quickly compared to other larger briskets I had made.

The night before I trimmed some excess fat from the little brisket and made a dry rub with the following ingredients.

2 Tbl smoked paprika
1.5 Tbl Brown Sugar
1 Tbl Kosher Salt
1 Tbl Garlic Powder
1 tsp Fresh Ground Black Pepper
1 tsp Onion Powder
1/2 tsp cumin

It was just enough to cover the whole thing. I wrapped it in Saran Wrap and placed it in the fridge overnight.

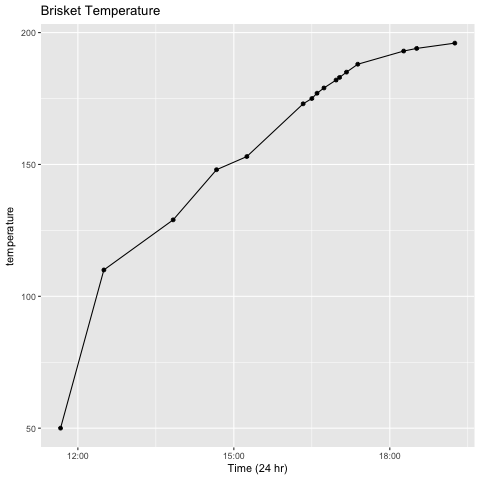
At 10:30 AM I took the brisket out of the fridge and turned on the smoker, setting the temperature to 230 F. After about an hour I inserted the thermometer probe, put the meat in the smoker and added Hickory wood chips. An hour out of the fridge and the internal temperature of the brisket was 50 F. I monitored the temperature throughout the day.

After about 3 hours, the stall kicked in at 153 F. So I made a mix of 1 part soy sauce, 1 part barbecue sauce and few shakes of Worcestershire sauce, and brushed it over the meat before wrapping it up in heavy duty aluminum foil. It was 2:40 PM. Dinner was supposed to be at 5:30. No problem right?

Most recipes for smoked brisket at 225 F call for 1 hr & 15 minutes/lb, so I figure I’d be done by 3 PM and could let the brisket rest for 2-3 hrs hours before serving. Some people wrap the foil sealed brisket in a towel and rest it in an insulated cooler for a few hours. I like that idea. But I was sure wrong about the overall cook time!

An hour and a half later, and the temperature was starting to climb. I had turned the smoker up to 250 F. But the rate was so slow, I figured the meat wouldn’t reach temperature (195 F) until 6:30, leaving no time to rest. It didn’t really matter, as I had plenty of Salmon, but I was sure hoping to impress with the Brisket. I know Kim’s dad likes beef a bit more than the big orangy fish.

At 4:00 I took the Salmon out of the fridge, checked it for bones, and brushed it with olive oil before sprinkling both sides liberally with kosher salt and fresh ground pepper. I also have a habit of scoring the skin side with my knife. I’ve heard it helps the skin release from surfaces, though in this case I doubt it matters. It was a very large hunk of fish, easily 18 inches long. So just before I threw it on the grill I cut it into 2 pieces. I cooked it with the grill closed for 20 minutes, the temperature gauge indicated 400-450 degrees. It felt done after about 15 minutes. I let it rest in a glass dish in the oven at 170 F (the lowest setting my oven will go) while I finished grilling marinated mushrooms, chunks of white onion, red and yellow sliced bell peppers, and asparagus.

Earlier in the day I had made some fresh hummus as an appetizer, and black bean and corn salad as a side dish.

Black Bean and Corn Salad
14 ounces black beans, drained
2 cups frozen corn kernels
1 red bell pepper, diced
1/2 red onion, chopped
1 1/2 teaspoons ground cumin
2 tablespoons olive oil
juice of one lime
a shake of hot sauce (or several depending on your guests)
1 avocado cubed (optional)
1/8 cup chopped cilantro (optional)
Salt and pepper

One thing I liked about this salad, was that I put all the ingredients in a bowl, poured the frozen corn on top, and then could leave it on the counter for an hour or two where it could keep itself cool.

I brushed the Salmon with a mix of butter and lemon juice, served it with a pot of white rice, the black bean and corn salad, grilled veggies, and asparagus. The salmon came out really good!

We had dinner about 6. The brisket was just finishing up, so I left it in the smoker before bringing it in and letting it rest insulated by a towel for 2 hours. I learned I should have double wrapped it as the foil had eroded or torn, even though it was heavy duty, so I lost some great flavor to the drain pan. Nonetheless, the brisket came out fantastic!

Simple Potato Salad

I like potato salad of all kinds. I grew up eating a simple German Potato salad made with potatoes, cucumbers, red onions and vinegar and oil, that my dad use to make whenever there was a get-together of some kind. And then there’s the other one, that typically came from the store, and was often at picnics. The yellow American one with a mayonnaise and mustard dressing, and maybe some hard-boiled egg and celery in it. No one in my family made that one, but I love them both. Those are the only two kinds of potato salad I know. I often wonder, why just two?

So I’m always on the look out for salads with potatoes. They’re not typically on restaurant menus, and when they come as a side, it’s usually some white thing with dill but no flavor. Often a deli will have something that looks tasty, but ends up being tasteless. One I see a lot looks like it’s full of stuff you’d find in a baked potato: cheddar cheese, green onions, bacon…but with no real dressing, so it comes off as dry and just gums up my mouth.

I don’t know what makes a good potato salad, but I’ve been trying to figure out a formula, and experiment with combining simple ingredients, to formulate something that I would crave, look forward to making and eating, the way I crave my father’s German potato salad.

We were having sandwiches for lunch the other day, and I had some potatoes, cucumber, and celery I needed to use up, so I gave the following a try, and it was pretty good:

3 small golden potatoes
2 stalks of celery, diced
1/3 English cucumber, peeled, 1/2 moon slices
1/4 cup diced white onion
a few leaves of chopped Italian parsley

Dressing:
2 Tbl apple cider vinegar
4 Tbl olive oil
1 small garlic clove, finely diced.

Boil potatoes with skins on just until soft. Place under cold water, and remove skins. Cut the potatoes in half, and then slice. They were still slightly warm so I drizzled a small amount of apple cider vinegar on them to absorb while warm. After they cooled a bit more, I added the other ingredients, along with salt and pepper to taste. I also sliced a few small cherry tomatoes for color. I would have used red or green onion if I had any, but I was trying to get rid of the stuff I had – and this worked pretty well. It was enough for 4 people to have a single serving at lunch.

So the basic formula for this is: a few potatoes, some veggies you have laying around that you can cut in a way that suits your bite for the day (cucumber, celery, bell pepper, etc.), some type of onion, an herb of your choice, and a vinaigrette. 

Instant Pot Bolognese

When I make spaghetti sauce with meat I usually start at 3:30 in the afternoon. I want the sauce to simmer for at least 3 hours. If things at work get the best of me and I can’t make it home in time…I punt on the process and make something else. I’m not sure anyone else in the family is as picky as me, but I like a sauce where the meat dissolves in your mouth, and time is the only way I’ve known to achieve this.

Enter the Instant Pot. If it can cook a savory stew in 30 minutes, surely it can make a nice red sauce quickly as well, no? I gave it a try to find out.

I started using the saute function to brown 1 lb hamburger (ground sirloin), and threw in 1/2 diced onion, 1/2 – 1 tsp salt. The onion and meat cook together without any problem. Once the meat looses its water and you’ll know the browning is finished. The bottom of the pan was getting a little rough. At this point I throw in 1 Tbl of tomato paste and stir it around in the meat, then some red wine to deglaze the pan and provide liquid for the steam. After 30 seconds I throw in a jar of sauce – it doesn’t really matter what brand, just pick something you like. My wife likes Ragu, I like Rao’s. I put the sauce on top, I don’t even stir it, then I put the lid on, set it to 25 minutes (meat/stew setting), and voila! I let it do natural release for at least 10 minutes before opening it up and giving it a good stir. The consistency is fine as is, or you can thicken it using the saute function and stirring. It’s a great way to have a delicious sauce that tastes as if it’s been cooking for several hours in basically a single hour start to finish.

Beef Stew in the Instant Pot

Last year I got an Instant Pot for Christmas. The IP Lux model. I used it for our annual tamale party and it was great for getting the tamales done in record time. But it’s been sitting on the counter for the last 11 months, essentially unused. I did cook one thing it, but I remember not being impressed, and haven’t taken the time to figure it out, or experiment with it. Plus, I’ve been a little skeptical luddite-wise, as in how can something cooked quickly be as good as something that simmers all day long?

But today my question was answered. Now that my teaching schedule is over, I’ve been enjoying the lovely fall weather, and taking time for things I’ve been putting off.

1 lb of stew meat
toss with 1/4 cup flour, 1/2 tsp salt, pepper
2 Tbl olive oil in Instant Pot on simmer
add a few sprinkles of soy sauce 
Simmer the meat for a few minutes then remove
1/2 to 1 chopped onion w/another Tbl olive oil
deglaze with 2 Tbl balsamic vinegar
add some beef stock ti finish deglazing
add back the meat

add 2 diced potatoes
3 diced carrots
3 diced celery stalks
a bunch of quartered mushrooms
1 Tbl tomato paste
1/2 tsp salt
pepper
the rest of the stock (total of 2 cans)
1-2 Tbl soy sauce
whatever flour mix was left over form breading the meat.

cover with lid and cook for 30 minutes
took 15 minutes to get up to temperature
then 30 minutes for natural steam release
so total cook time was 1 hr 15 minutes
after opening the lid, turn to saute and add cornstarch mix
stir for 2 minutes
add 1/2 cup of frozen peas

It was really good!
The meat was fall apart tender.

Corn Tortillas

Every year around Christmas I buy fresh masa at the Mexican market for making tamales. I also buy a bag of Masa Harina flour as a kind of insurance policy in case I run out of fresh masa. I end up not using it, and it sits in the cabinet all year. I always figured I could use it to make corn tortillas. This year, after the bag sat in the cabinet for 9 months, I finally decided to give it a try.

Corn tortillas are another one of my inconvenient struggles. I like them, but the market down the street sells two kinds: small bags of ultra thin corn tortillas by the dozen – too thin for most things, and large 2 lb bags of the regular corn tortillas I grew up with, the ones that are just under an 1/8 inch thick, and good for making enchiladas, or tostadas, or Mexican hot dogs, or anything. However, a 2 lb bag is more than I can use, and I inevitably end up throwing some out. Although I did purchase a vacuum sealer just after making tamales this year, so I could store them better, and have been using that to freeze batches of corn tortillas in usable size bunches.

However, my tortilla problems are now solved! A little masa harina flour, a little water, a little rolling some dough, and voila! Fresh tortillas that are actually good!

My test batch was small:

3/4 cup Masa Harina Flour
1/2 cup warm water
1/4 tsp salt

the dough came together very easily. I needed it for a minute or two, divided it into six pieces, rolled out little disks with a rolling pin, and put them on hot griddle for minute or two until they started to form brown spots, then stored them in a cloth towel before using them to make 3 quesadillas. They were fantastic and easy and quick to make.